In the previous blog post, we configure a basic project using CMake. We included the Flecs Entity Component System (ECS) framework for the fundamental building blocks, as well as the Raylib game library for displaying entities on the screen. We also created two basic systems to display a position and move a entity according to it's velocity.
The plan for this blog post is to create some movement systems for the player and enemies. The player will require input from the user to move around, while the enemy will follow the player around. But before we get started with anything let's first do a small refactor of our current modules. At first, when I implemented the systems, modules were using each other, creating circular dependencies and I wanted to avoid that as much as possible. Below is a class diagram of how I designed the global structure of our game/engine.
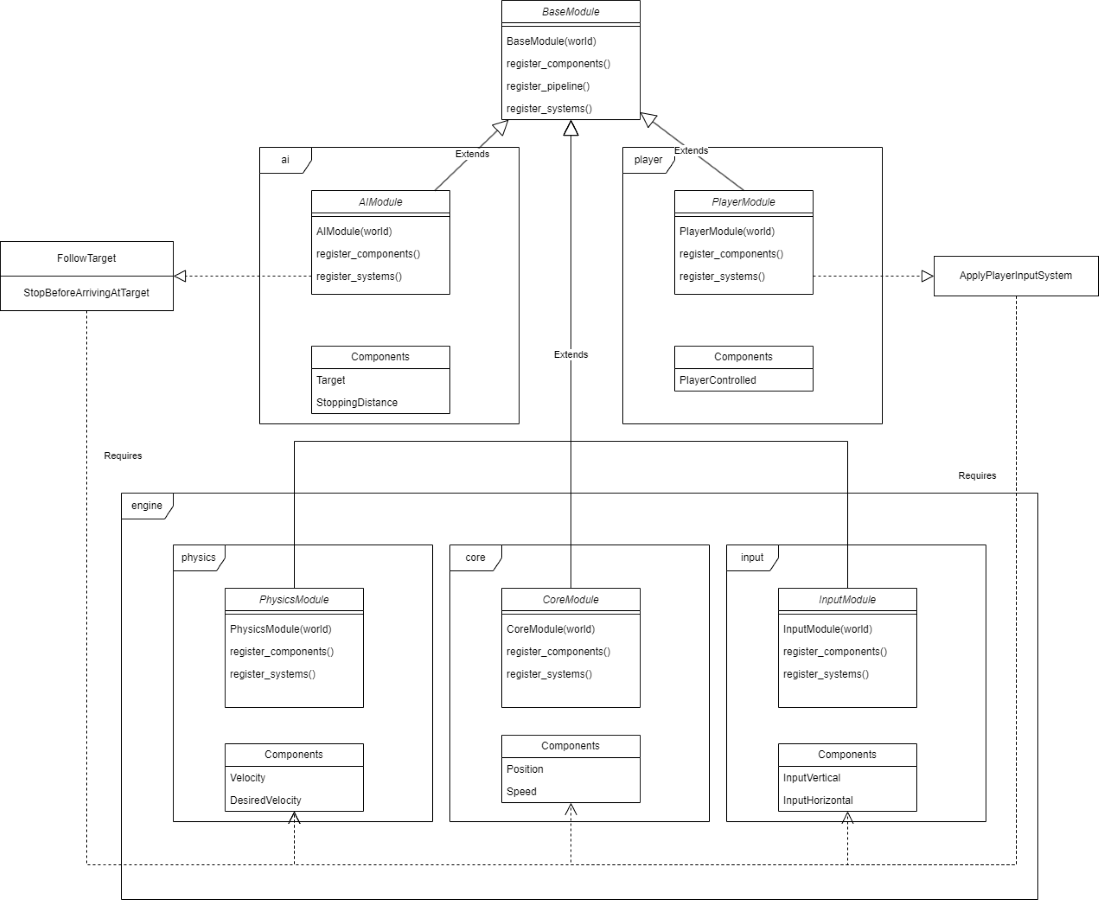
As a general idea, I want to keep simple modules in the engine package, like physics, core, and input, which are independent of game logic (to a certain extent). Then the player and AI packages are a bit more generalized and require certain components in the engine packages. For example, the player's movement systems will communicate with the physics package through the DesiredVelocity component. This diagram does not reflect the exact structure of the game, but I will try to stick closely to it. In this specific case, DesiredVelocity is strictly an input component, meaning the physics module uses it only to receive information, but never edits this component itself. It should only be used by outside modules.
After refactoring the modules, the structure now looks like this.

Let's start implementing the player movement first since we cannot have a game without a player. The first basic behaviour we have to implement for this is input handling. Our player can move along the x and y axis in a horizontal and vertical capacity. Let's reflect that in the input components:
struct InputHorizontal {
     float value;
};

struct InputVertical {
    float value;
};
So if the user presses the 'A' key they will move in the horizontal axis by -1, or by 1 if they press 'D'. We could also add the arrow keys if we would like. This would result in a system that would look like this:
world.system<InputHorizontal>("set horizontal input")
                .kind(flecs::PreUpdate)
                .each([](flecs::entity e, InputHorizontal &horizontal) {
                    if(IsKeyDown(KEY_A)) horizontal.value += -1
                    if(IsKeyDown(KEY_D)) horizontal.value += 1
                    if(IsKeyDown(LEFT)) horizontal.value += -1
                    if(IsKeyDown(RIGHT)) horizontal.value += 1
                });
While this is fine and would handle the player input, I can see the case where a player might want to rebind their input so that they may use keys that they are more comfortable with. While a modular keybinding system is definitely overkill for something as basic as WASD movement, I want to implement it for future input systems we might use. The following entity is an example of what could be used for the system above.
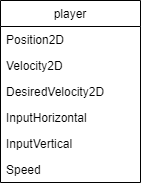
If we want to modularise this and add an option for keybindings we need the structure to change. First, let's move the input components into sub-entities of the player entity. We can then create a new component called KeyBinding and add it to the sub-entity.
struct KeyBinding {
    int key;
    float value;
};
Now we can give say, the binding of key 'A' and give it the value -1 so that when the user presses that binding the player can move to the left. However, you may have spotted an issue with this solution: An entity may only have one component of a specific type, we want to add four: A, D, Left, Right. We can fix this issue exactly the same way we tried to, by adding a composition layer.

We can do the exact same for the vertical input component, and assign them as many keybinds as we want. The system that handles the input will look like the code block below. The most important thing to notice here is the second line of the horizontal input system. term_at(1).cascade(). Essentially our system's primary target is the KeyBinding component, and we tell it to look for a parent with the InputHorizontal component. It links the two entities together and retrieves their components. Finally, we reset the input values for the next frame.
world.system<const KeyBinding, InputHorizontal>("set horizontal input")
            .term_at(1).cascade()
            .kind(flecs::PreUpdate)
            .each([](const KeyBinding &binding, InputHorizontal &horizontal) {
                if (IsKeyDown(binding.key)) {
                    horizontal.value += binding.value;
                }
            });


world.system<InputHorizontal>("Reset Input Horizontal")
            .kind(flecs::PostUpdate)
            .each([](InputHorizontal &horizontal) {
                horizontal.value = 0;
            });
Here is the code to create the input components themselves. InputHorizontal is a child of the player, and the keybinding are children of InputHorizontal.
auto hori = m_world.entity("player_horizontal_input").child_of(player)
            .set<input::InputHorizontal>({});
    m_world.entity().child_of(hori)
        .set<input::KeyBinding>({KEY_A, -1});
    m_world.entity().child_of(hori)
        .set<input::KeyBinding>({KEY_D, 1});
    m_world.entity().child_of(hori)
        .set<input::KeyBinding>({KEY_LEFT, -1});
    m_world.entity().child_of(hori)
        .set<input::KeyBinding>({KEY_RIGHT, 1});
Now that the input is handled, we need to translate it to player movement. To do so, we first add a component in the physics module called DesiredVelocity2D and also add an acceleration component.
struct DesiredVelocity2D {
     Vector2 value;
 };
 struct AccelerationSpeed {
     float value;
 };
Then before moving the entity according to its velocity, we can linearly interpolate the desired velocity with the current one. This will result in a smooth acceleration and locomotion.
world.system<Velocity2D, const DesiredVelocity2D, const AccelerationSpeed>("Lerp Current to Desired Velocity")
            .kind(flecs::PostUpdate)
            .each([](flecs::iter &it, size_t, Velocity2D &vel,
            const DesiredVelocity2D &desiredVel,
            const AccelerationSpeed &acceleration_speed) {
                // eventually I want to use spherical linear interpolation for 				   // a smooth transition
                vel.value = Vector2Lerp(
                	vel.value,
                    desiredVel.value,
                    it.delta_time() * acceleration_speed.value);
            });
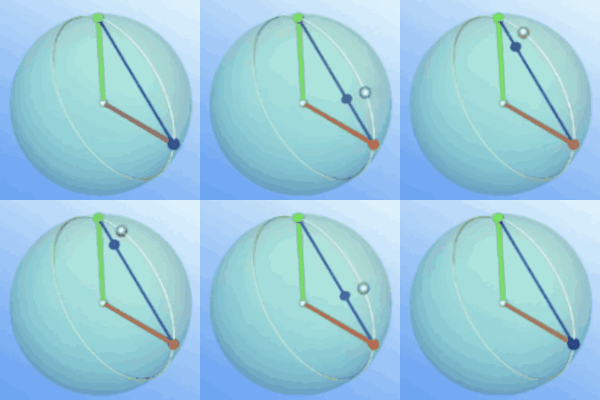
You have probably noticed the comment in the Lerp system, what I mean by "spherical" linear interpolation is demonstrated in the figure above. A regular linear interpolation would go straight from p1 to p2, while a spherical one (circular in our case) would follow the unit radius around a point, from p1 to p2. Another way of picturing this is when we travel by plane from point A to B. A linear interpolation would have you traverse through the centre of the earth if point B was on the other side of the earth. The correct way would be to travel across the circumference of the earth, a spherical linear interpolation. Ultimately this might impact gameplay and feel, so this is the kind of that while it is the "correct" way, it might not be the best suited for the game.
Now, let's pass information through the DesiredVelocity component from the player module. Again we are using the .cacade() function to tell the system the parent has DesiredVelocity2D, and then we apply the input to it, finally, we normalize the velocity to get the direction and apply the player speed, resulting in the wanted velocity.
world.system<const input::InputHorizontal, physics::DesiredVelocity2D>()
            .term_at(1).parent().cascade()
            .each([](const input::InputHorizontal &horizontal,
                     physics::DesiredVelocity2D &desired_vel) {
                desired_vel.value.x = horizontal.value;
            });

world.system<const input::InputVertical, physics::DesiredVelocity2D>()
            .term_at(1).parent().cascade()
            .each([](const input::InputVertical &vertical,
                     physics::DesiredVelocity2D &desired_vel) {
                desired_vel.value.y = vertical.value;
            });

world.system<physics::DesiredVelocity2D, const core::Speed>()
            .each([](physics::DesiredVelocity2D &velocity,
                     const core::Speed &speed) {
                velocity.value = Vector2Normalize(velocity.value)
                	* speed.value;
            });
In game.cpp's constructor let's quickly setup our player.
flecs::entity player = m_world.entity("player")
            .set<core::Position2D>({0, 0})
            .set<core::Speed>({300})
            .set<physics::Velocity2D>({0, 0})
            .set<physics::DesiredVelocity2D>({0, 0})
            .set<physics::AccelerationSpeed>({5.0});

    auto hori = m_world.entity("player_horizontal_input").child_of(player)
            .set<input::InputHorizontal>({});
    m_world.entity().child_of(hori)
        .set<input::KeyBinding>({KEY_A, -1});
    m_world.entity().child_of(hori)
        .set<input::KeyBinding>({KEY_D, 1});
    m_world.entity().child_of(hori)
        .set<input::KeyBinding>({KEY_LEFT, -1});
    m_world.entity().child_of(hori)
        .set<input::KeyBinding>({KEY_RIGHT, 1});

    auto vert = m_world.entity("player_vertical_input").child_of(player)
            .set<input::InputVertical>({});
    m_world.entity().child_of(vert)
        .set<input::KeyBinding>({KEY_W, -1});
    m_world.entity().child_of(vert)
        .set<input::KeyBinding>({KEY_S, 1});
    m_world.entity().child_of(vert)
        .set<input::KeyBinding>({KEY_UP, -1});
    m_world.entity().child_of(vert)
        .set<input::KeyBinding>({KEY_DOWN, 1});
And in the run function, we add the required code to render the player.
...

ClearBackground(RAYWHITE);

DrawCircle(
	m_world.entity("player").get<core::Position2D>()->value.x,
    m_world.entity("player").get<core::Position2D>()->value.y,
    25.0,
    GREEN);

...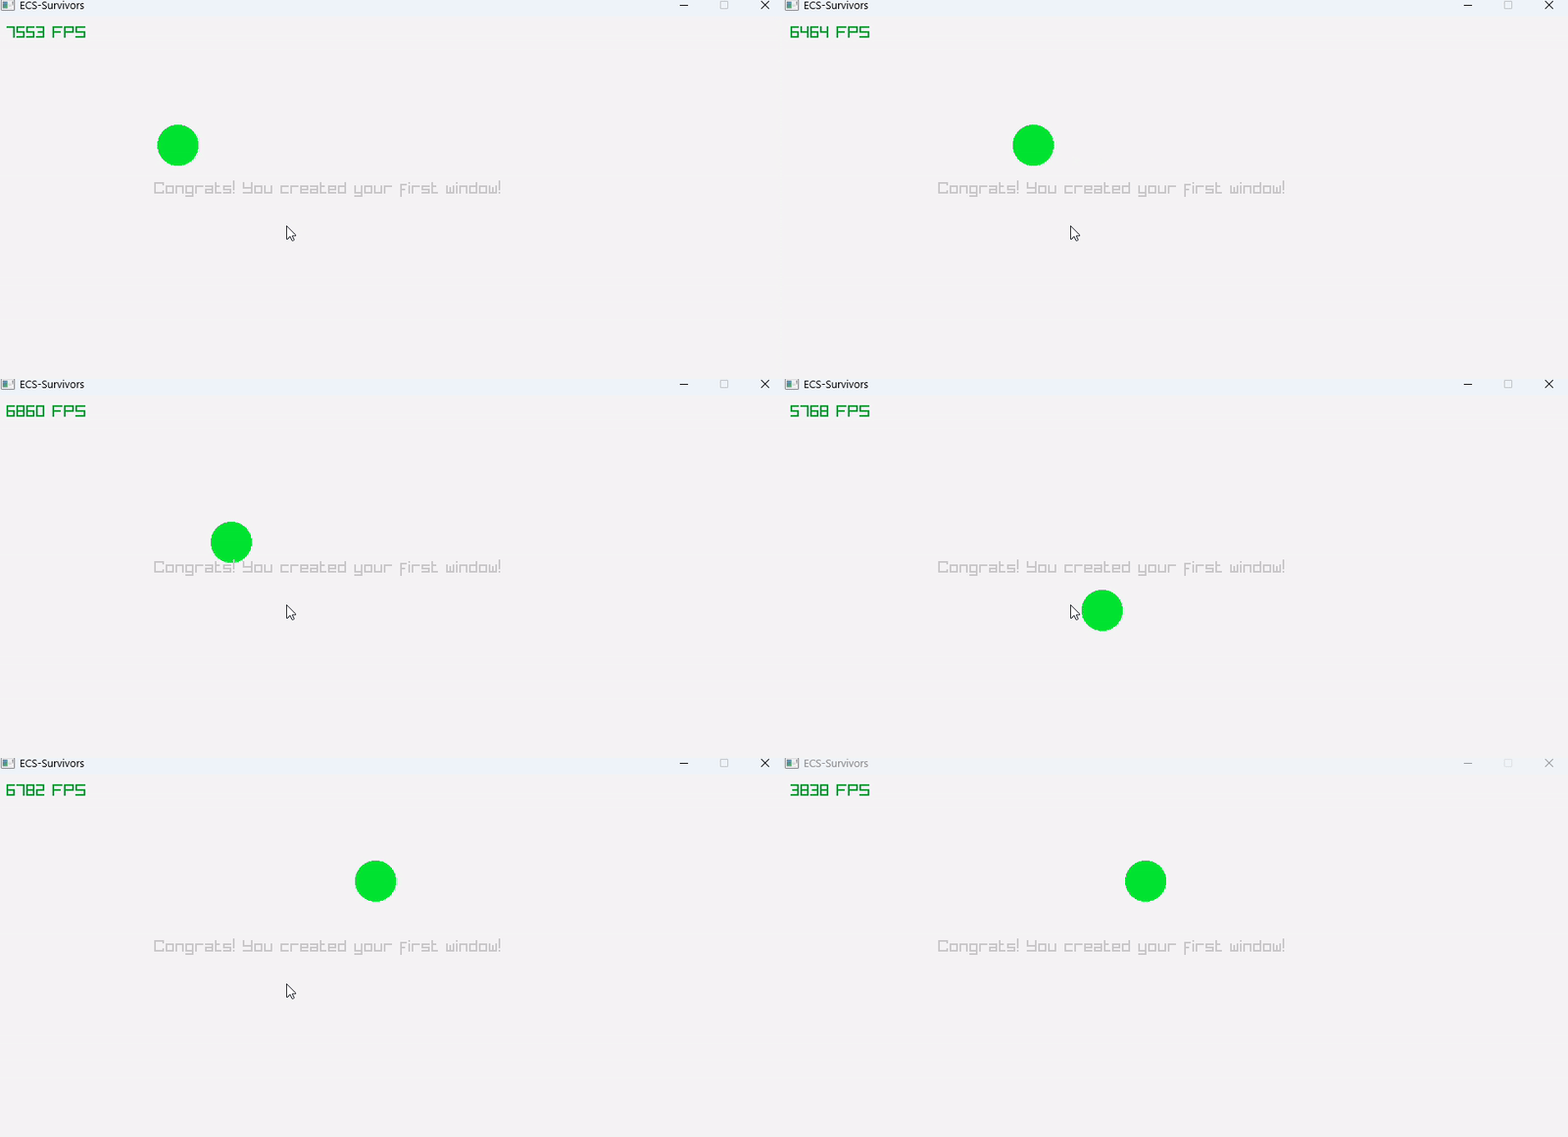
We now have a moving player! Onto the enemy behaviour. We want our enemy to follow the player until it reaches it. To do so, we can give the enemy a Target component to follow, a StoppingDistance component to stop following when it has arrived, and a FollowTarget tag, to indicate the enemy to follow the specific target. Later maybe we can have a RunFromTarget tag instead, so the enemy may run from the player.
struct Target {
    std::string name;
};

struct FollowTarget {};

struct StoppingDistance {
    float value;
};
The enemy systems will require a few more components but are still quite simple, we need a system to determine the direction the target is in and set the desired velocity of the enemy to the direction multiplied by its speed. The second system will be to set the desired velocity to zero if the distance between the target and the enemy is less than the stopping distance.
world.system<const Target, const core::Position2D, const core::Speed, physics::DesiredVelocity2D>()
            .with<FollowTarget>()
            .each([world](const Target &target,
                          const core::Position2D &position,
                          const core::Speed &speed,
                          physics::DesiredVelocity2D &velocity) {
                const flecs::entity e = world.entity(target.name.c_str());
                if (e != world.lookup(target.name.c_str())) return;
                const Vector2 dir = Vector2Normalize(e.get<core::Position2D>()->value - position.value);
                velocity.value = dir * speed.value;
            });

world.system<const StoppingDistance, const Target, const core::Position2D, physics::DesiredVelocity2D>()
                .each([world](const StoppingDistance &distance,
                              const Target &target,
                              const core::Position2D &pos,
                              physics::DesiredVelocity2D &velocity) {
                    const flecs::entity e = world.entity(target.name.c_str());
                    if (e != world.lookup(target.name.c_str())) return;
                    const Vector2 ab = e.get<core::Position2D>()->value - pos.value;

                    // using the squared length is faster computationally
                    const float distSquared = Vector2LengthSqr(ab);

                    // square the distance
                    if (distSquared < distance.value * distance.value) {
                        velocity.value = {0, 0};
                    }
                });
The beauty of the systems we created before, is that they will be reused by the enemy entity, specifically the physics ones. The systems above is the only behaviours we had to implement for the enemy to follow a target. We now add the enemy entity in game.cpp.
... player code

m_world.entity("enemy")
            .set<core::Position2D>({800, 400})
            .set<core::Speed>({150})
            .set<physics::Velocity2D>({0, 0})
            .set<physics::DesiredVelocity2D>({0, 0})
            .set<physics::AccelerationSpeed>({5.0})
            .set<ai::Target>({"player"})
            .add<ai::FollowTarget>()
.set<ai::StoppingDistance>({50.0});... loop
DrawCircle(
m_world.entity("enemy").get<core::Position2D>()->value.x,
m_world.entity("enemy").get<core::Position2D>()->value.y,
25.0,
RED);
... draw player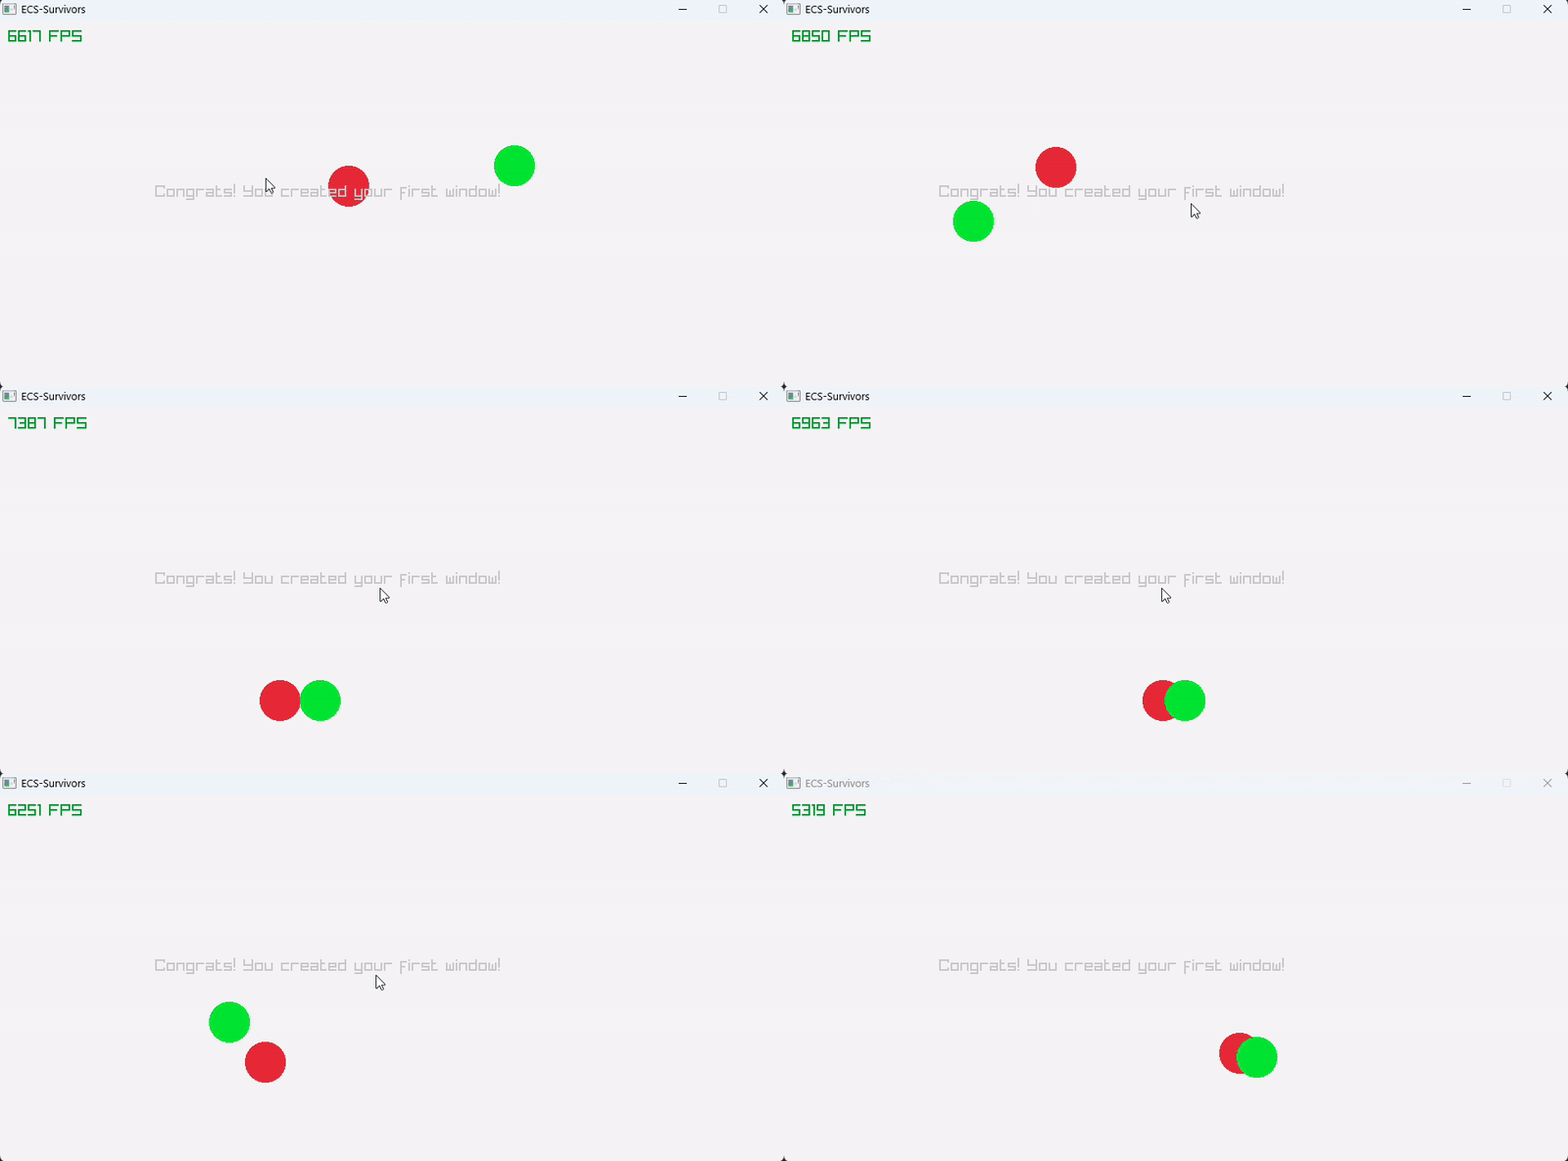
There we have it, we now have player and enemy movement which is already a solid foundation for a survivor-type game. We cleaned up the structure of the project, and are trying to keep modules for reference each other to create circular dependencies. We implemented a modular input system that allows for binding keys for certain input actions. We implemented player movement as well as enemy follow behaviour. This post has been long enough but has been a lot of fun for me to write and plan, overall I am very happy with what we currently have.
In the next few blogs I want address a few issues we currently have. The first is rendering and GUI. Currently, we are rendering entities without using systems, I want to fix that. We will have to create a proper pipeline, to ensure systems are performed whenever we want them to, and in the proper order. After that, we will look into some more physics, collisions being the subject, we don't want any overlapping entities (with some exceptions).
You can play the latest build of ECS-Survivors here, and see the source code on GitHub

